Module 01 of 06
35 minutesBeam types, load paths and idealization
Recognize five beam systems, then choose supports and compare results in one guided activity.
Suggested pacing · 35 minutes
- Illustrated systems and worked comparison15 min
- Guided support activity and recap15 min
- Knowledge check5 min
Work at your pace and record actual engaged time. Optional references and extensions may take longer.
Browse the sections in this lesson
Choose supports that match how the real beam can move. In this lesson, you will recognize five beam systems and practise with one supplied example.
Read the illustrated lesson, complete three guided practice steps, then answer three quick questions. Formulas and worked answers are provided. Your workbook entry is built from your answers.
Start with the load path
Trace each load from its point of application to the supports. Record what transfers shear, what transfers axial force, and whether the connection can develop a meaningful couple. A clean sketch with dimensions and restraint directions is more valuable than an early, polished response diagram.
- Define the member centreline and analysis extent.
- Identify the restraints the surrounding structure can actually provide.
- Apply loads at their physical locations and over their real tributary lengths.
- Assign material and section stiffness consistently.
- State what the model omits before interpreting the result.
Recognize the beam system before choosing a formula
A beam type is defined by its support and continuity conditions—not by whether the member is steel, timber or concrete. The same cross-section can behave as a simple span, cantilever or continuous member depending on how it connects to the surrounding structure. That distinction controls the reaction set, bending-moment pattern and appropriate verification equations.
Guide-to-course field atlas
Five beam systems, from real structure to benchmark
Use the same sequence for every system: recognize the physical load path, assign restraints, predict the response, check a reference case, then challenge the assumption most likely to invalidate the model.
Simply supported
Determinate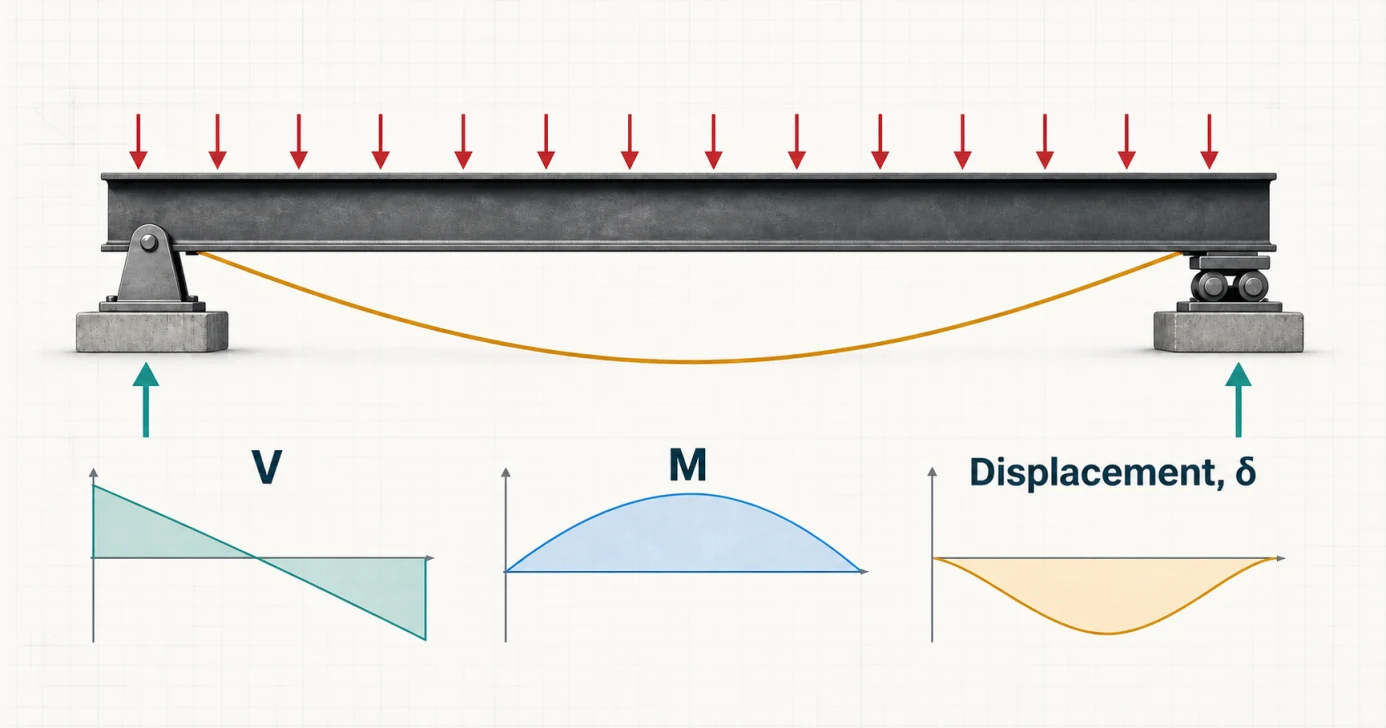
Where it appearsBridge girders on bearings, joists bearing on walls, lintels and beams with simple shear connections.
Ideal modelPin at A and roller at B. Vertical displacement is restrained at both ends; rotation remains free; one end can accommodate longitudinal movement.
Response signatureZero ideal end moments. A symmetric downward UDL produces equal reactions, positive sagging moment and a symmetric downward elastic curve.
RA = RB = wL/2
Mmax = wL2/8
δmax = 5wL4/(384EI)
Assumption to defendDo not assume “simple” merely because a connection is drawn with bolts. Confirm that connection and surrounding-frame rotational stiffness are negligible for the result being checked.
Open the complete simply supported guideCantilever
Determinate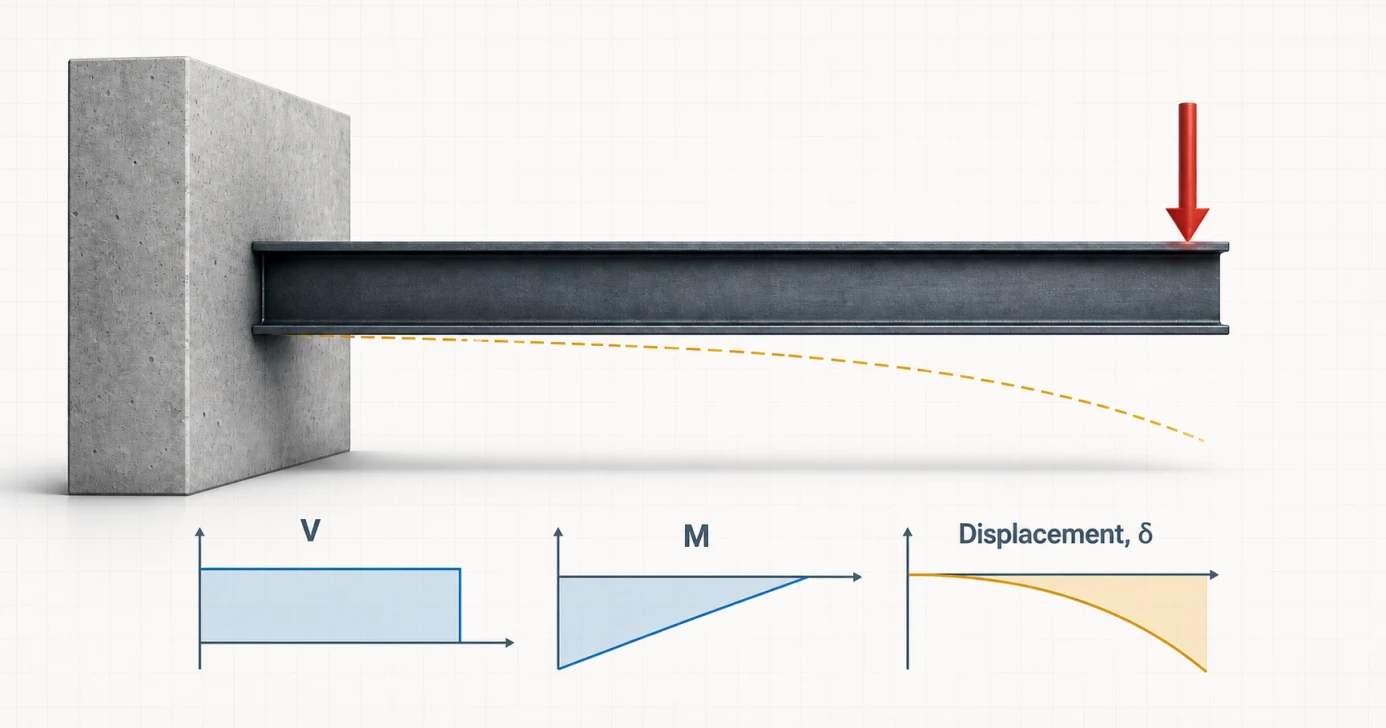
Where it appearsBalconies, entrance canopies, mast arms, brackets, retaining-wall stems and projecting roof elements.
Ideal modelOne end restrains translation and rotation; the other is free. The support must deliver shear, axial force when present and a moment couple.
Response signatureFor downward transverse loading, moment magnitude grows toward the fixity and the largest displacement normally occurs at the free tip.
VA = P
MA = −PL
δtip = PL3/(3EI)
Assumption to defendThe wall, column, base plate or foundation may rotate. A perfectly fixed symbol can seriously understate deflection when the supporting system is flexible.
Open the complete cantilever guideFixed–fixed
Indeterminate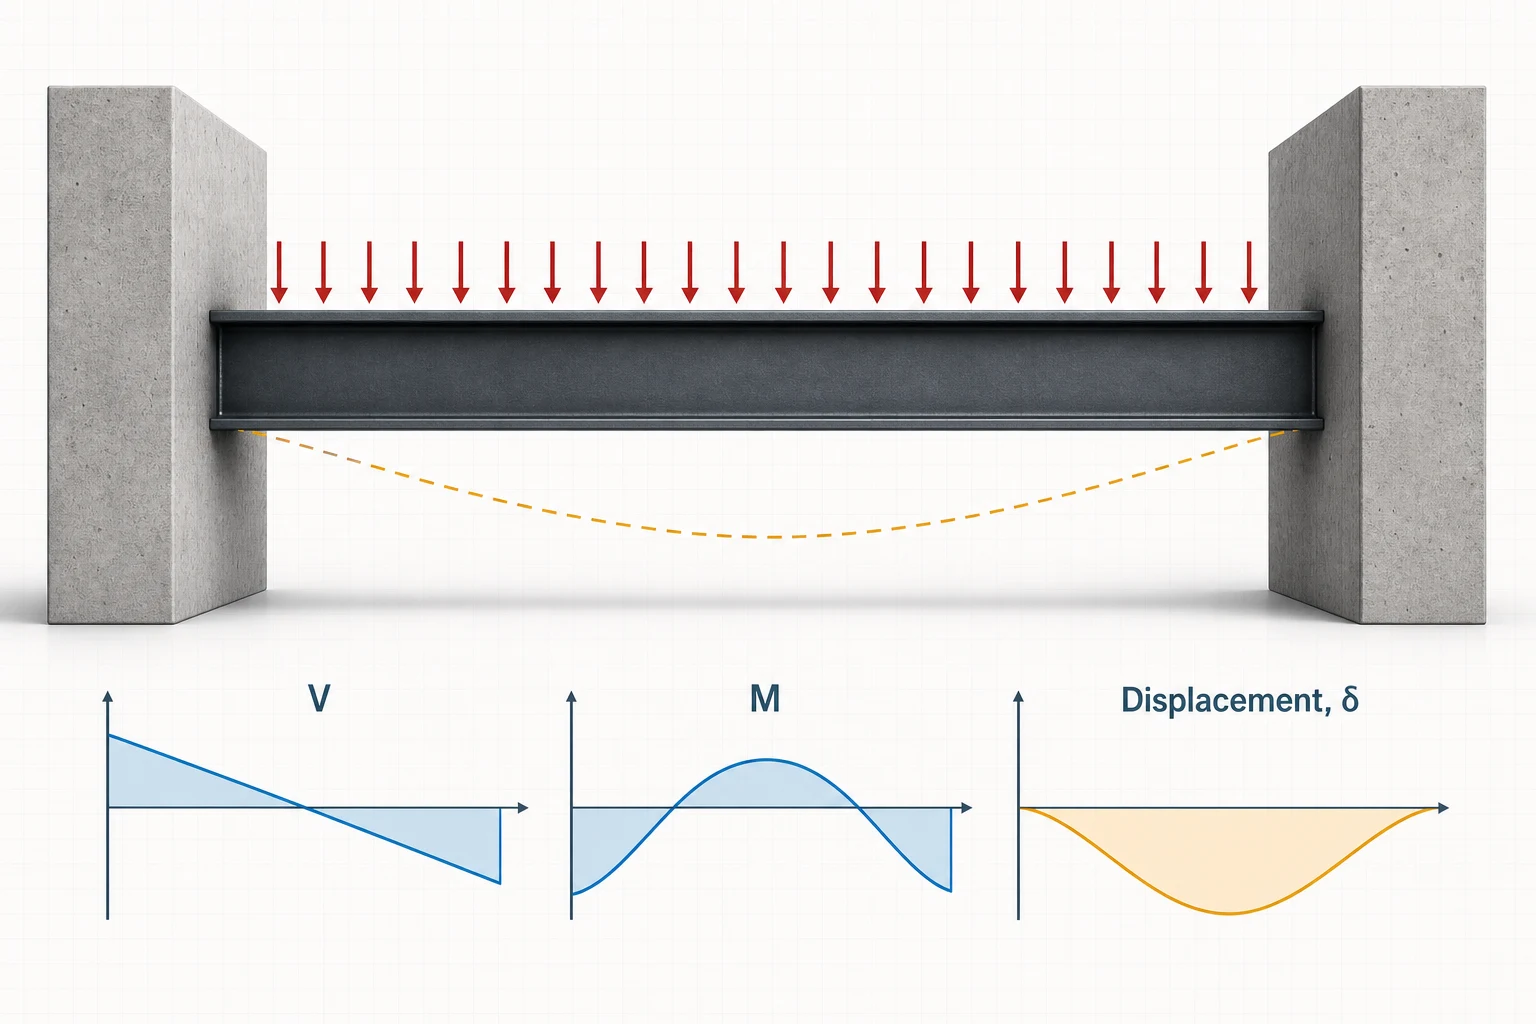
Where it appearsMonolithic concrete frames, moment-frame girders and machine members clamped by sufficiently stiff supports.
Ideal modelVertical displacement and rotation are restrained at both ends. Compatibility and EI are required to determine the end moments.
Response signatureGravity load creates hogging at the supports, sagging in the span and substantially less deflection than the equivalent simple span.
RA = RB = wL/2
MA = MB = −wL2/12
Mmid = +wL2/24
δmid = wL4/(384EI)
Assumption to defendFixity is a stiffness assumption—not a connection label. Check the joint, columns or walls, foundations and adjacent framing that must supply rotational restraint.
Open the complete fixed–fixed guideOverhanging
Usually determinate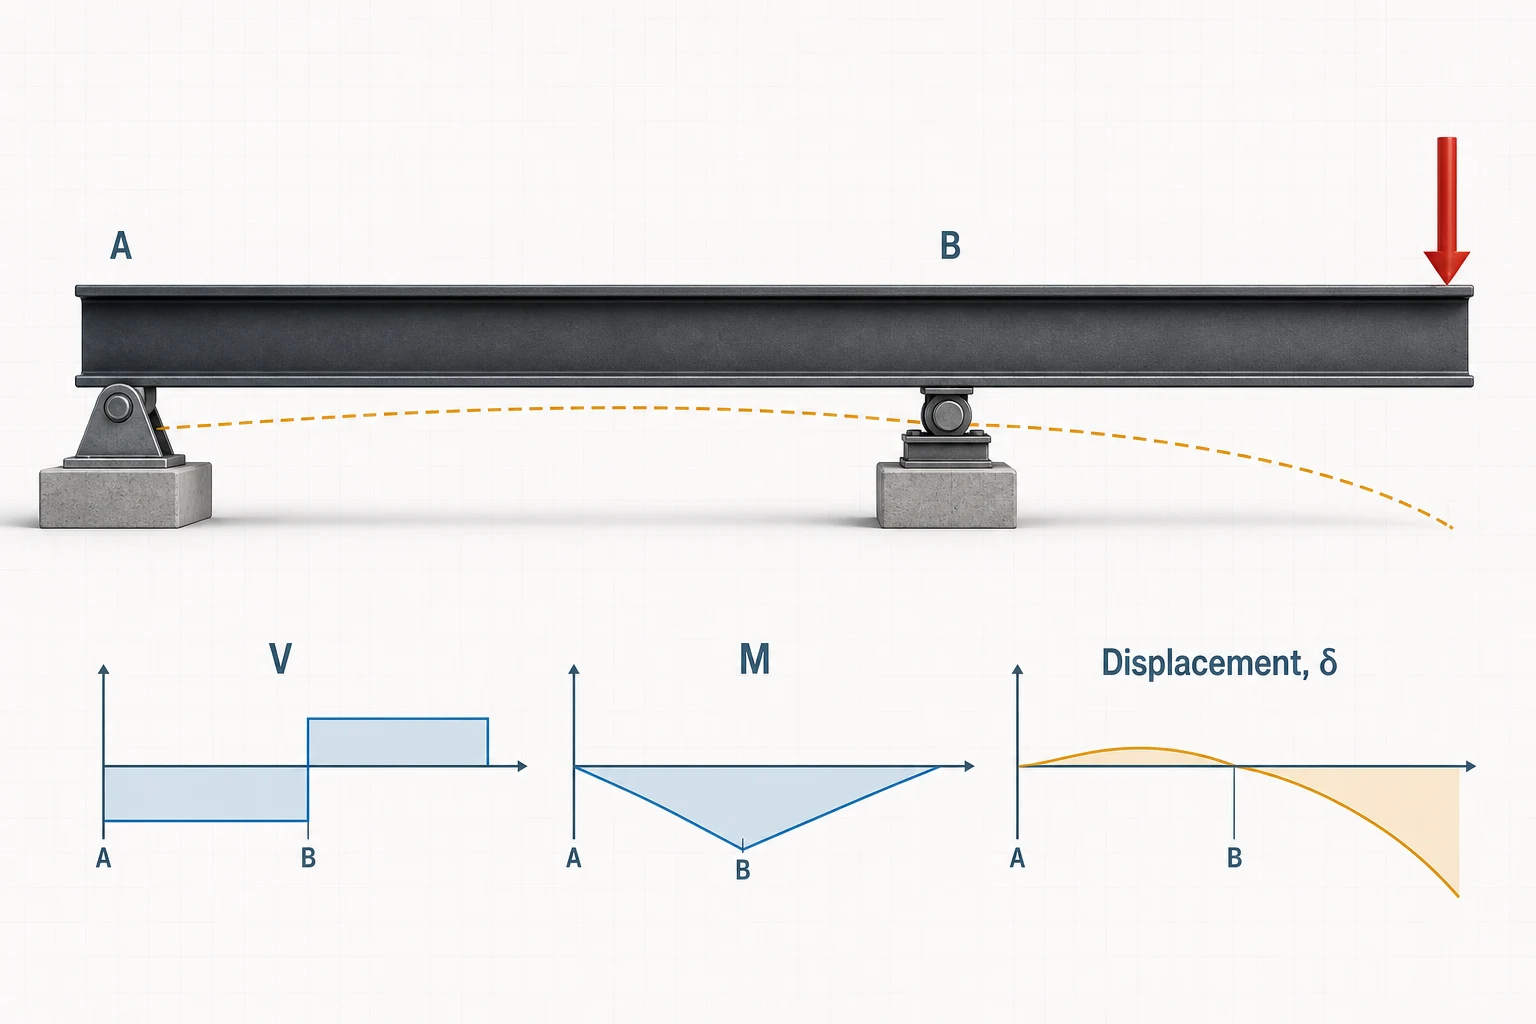
Where it appearsRoof eaves, platform edges, canopy beams and framing that projects beyond the last column or bearing.
Ideal modelA pin and roller lie inside the member length, leaving a free projection. The support span is L and the overhang length is a.
Response signatureOverhang loading creates negative moment at the inboard support and can reverse the remote reaction, demanding a real uplift load path.
RA = −Pa/L
RB = P(L+a)/L
MB = −Pa
δtip = Pa2(L+a)/(3EI)
Assumption to defendA negative reaction is not only a sign convention. Bearing-only contact cannot pull on the beam; add a hold-down, stabilizing load or a different support model.
Open the complete overhanging guideContinuous
Indeterminate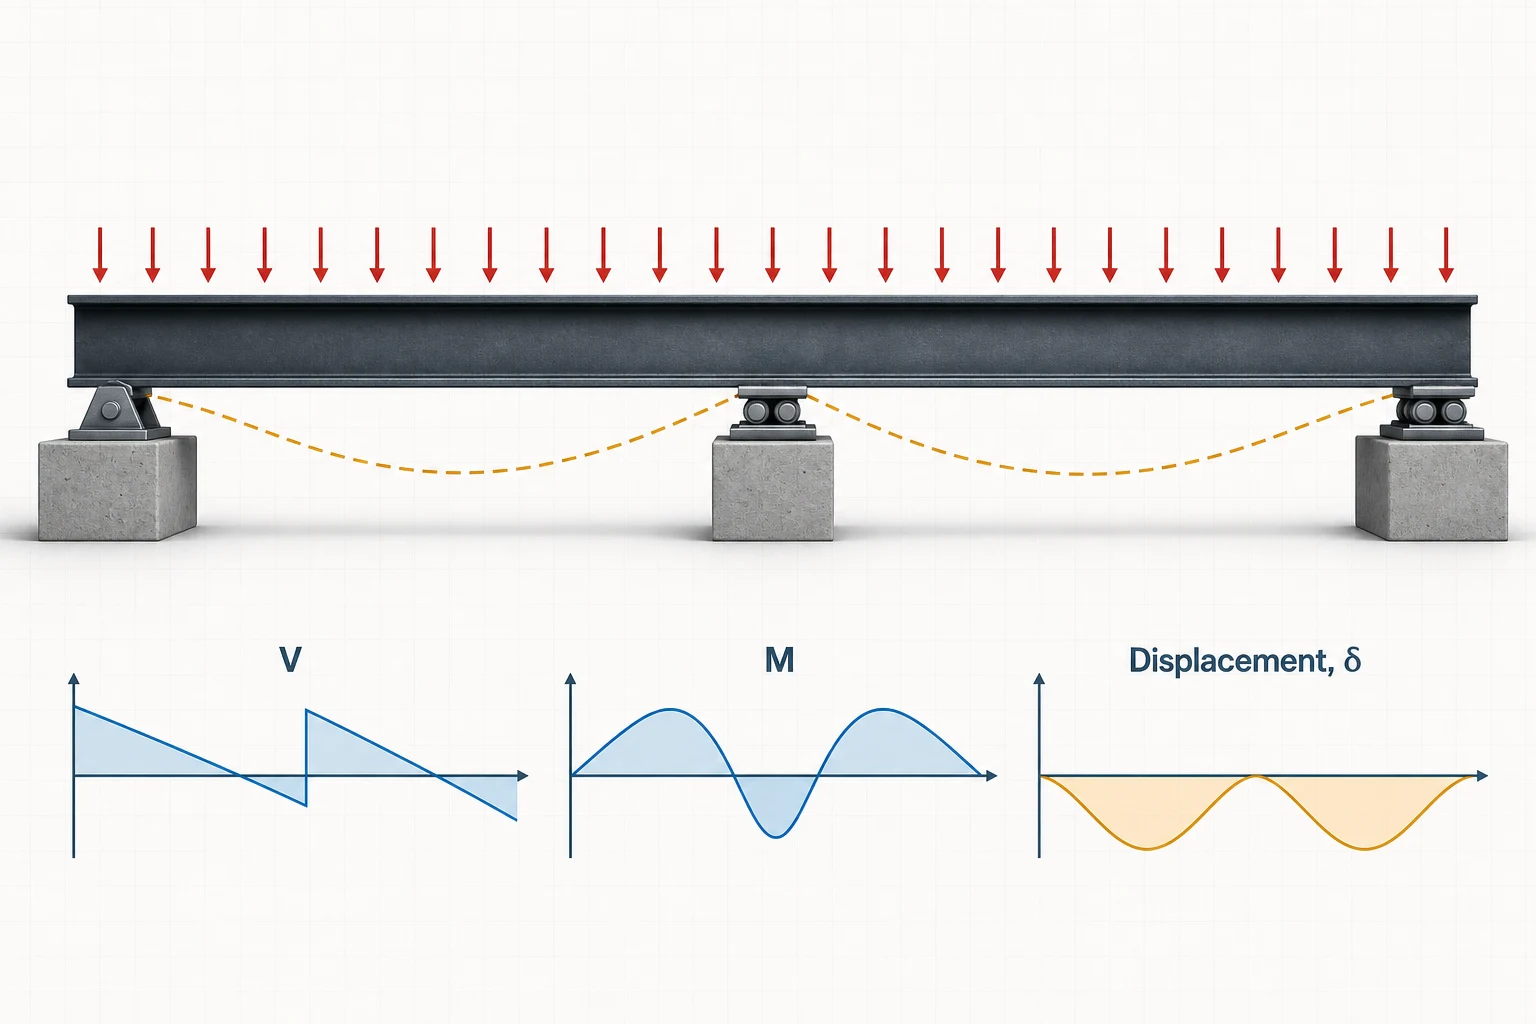
Where it appearsMulti-span bridge girders, floor beams over columns and roof purlins passing across several frames.
Ideal modelOne uncut member passes over three or more supports. Adjacent spans share rotation at an interior support, so their responses are coupled.
Response signatureContinuity creates negative interior-support moment, redistributes reactions and usually reduces balanced-load positive moment and deflection.
RA = RC = 3wℓ/8; RB = 5wℓ/4
MB = −wℓ2/8
M+max = 9wℓ2/128
Assumption to defendMembers touching at a support are not automatically continuous. Moment must pass through an uncut section or a connection capable of sustaining the required rotation compatibility.
Open the complete continuous guideHow to use the references: the equations are benchmark cases, not universal beam formulas. They are valid only for the stated geometry, loading, constant EI and boundary conditions. The dedicated guides add live diagrams, alternate load cases and full worked calculations; use them as references while completing the guided activity below.
A four-question beam-type screen
- Where can the member translate, and where can it rotate?
- Does the member continue through a support, terminate there, or project beyond it?
- Can the connection actually develop the modeled moment or uplift force?
- Would support settlement, joint flexibility or loss of contact change the load path?
Read the restraint before drawing the reaction
A support symbol is a compact statement about movement. In a two-dimensional frame model, a beam-end node can translate horizontally, translate vertically and rotate. Restraining any one of those degrees of freedom introduces the corresponding possible reaction component; whether that reaction is non-zero depends on the load case.
Degrees of freedom → reactions
Convert physical behavior into three model decisions
- 1Identify allowed movementCan the node move in x, move in y, or rotate?
- 2Mark each restraintA restraint imposes a displacement boundary condition.
- 3Draw possible reactionsRestrained translation creates force; restrained rotation creates moment.
Three common idealizations
Symbol, physical realization and model consequence
Start with what the connection lets the beam do, then add only the reaction components associated with restrained movement.
Roller support
Carries force normal to its bearing surface while allowing movement along the bearing and end rotation.
- Moves freely
- Tangential translation ut and rotation θ
- Restrains
- Normal translation un = 0
- Possible reactions
- Rn · one force normal to the surface
- Beam-end condition
- Horizontal beam end: v = 0; M = 0 if no end couple is applied
Can the physical bearing slide in the modeled direction without binding?
Modeling cautionA roller reaction is normal to the bearing surface; it is not automatically vertical.
Pinned support
Holds the beam-end node in place while allowing it to rotate without an idealized moment reaction.
- Moves freely
- Rotation θ
- Restrains
- ux = 0 and uy = 0
- Possible reactions
- Rx, Ry · two force components
- Beam-end condition
- Beam end in bending: v = 0; M = 0 if no end couple is applied
Is connection moment small enough to neglect for the result being checked?
Modeling cautionA support pin restrains a node relative to ground. An internal hinge joins members and releases transferred moment; they are not interchangeable.
Fixed support
Prevents translation and rotation, so the connection must transfer force and a moment couple into the supporting system.
- Moves freely
- No movement in the idealized 2D model
- Restrains
- ux = 0, uy = 0 and θ = 0
- Possible reactions
- Rx, Ry, M · two forces plus moment
- Beam-end condition
- Beam end: v = 0 and dv/dx = 0
Which connection, column, wall or foundation supplies the modeled moment restraint?
Modeling cautionReal connections are often semi-rigid. Perfect fixity is credible only when the complete supporting system is sufficiently stiff.
State the theory boundary
The calculator’s classical beam response assumes a small-displacement, linear-elastic idealization. The member centreline, support locations, applied loads, modulus of elasticity and section properties must be internally consistent. Local connection deformation, lateral-torsional behaviour, shear deformation, material yielding, construction sequence and load redistribution may require separate treatment.
A shear connection is modeled as fixed because the software’s default support looked convenient. The model becomes artificially stiff, end moments appear, midspan moment falls, and deflection is suppressed. The output can be numerically precise while representing the wrong structure.
Same beam and load. Change only the supports.
Compare reactions, bending moments and deflection. Every case uses the same inputs.
- SpanL = 6 m
- Full-span uniform loadw = 8 kN/m
- Elastic modulusE = 200 GPa
- Second moment of areaI = 200 × 106 mm4
Positive moment = sagging. Negative moment = hogging. The sketches show shape; compare the numbers for size.
Simply supported
Both ends can rotate.
Vertical reactions
RA = RB = wL2
24 kN eachUpward at A and B
Bending moment
Mmax = wL28
+36 kN·mSagging at midspan
Maximum deflection
δmax = 5wL4384EI
3.375 mmDownward at midspan
Fixed–fixed
Neither end can rotate.
Vertical reactions
RA = RB = wL2
24 kN eachUpward at A and B
Bending moment
MA = MB = −wL212
−24 kN·mHogging at both ends
Mmid = +wL224
+12 kN·mSagging at midspan
Maximum deflection
δmax = wL4384EI
0.675 mmDownward at midspan
Cantilever
Fixed at A; free at B.
Vertical reactions
RA = wL
48 kNUpward at A
Bending moment
MA = −wL22
−144 kN·mHogging at the fixed end
Maximum deflection
δmax = wL48EI
32.4 mmDownward at the free tip
For deflection in mm, use w = 8 N/mm, L = 6,000 mm and E = 200,000 N/mm², with I as given above. Open the formula reference →
Same total load: 48 kN. Very different bending and movement. The simply supported beam deflects 5 times as much as the fixed–fixed beam. Choose supports that match the real connections.
What changes when the supports change?
The support arrangement changes where a beam bends and how far it moves. Compare the ends, the middle and any free tip below. These patterns help you choose the right model before using a formula.
Sagging (+)
Curves like a smile.
Hogging (−)
Curves like a frown.
Read each picture from top to bottom: supports and load → deflected shape → bending moment. Shapes are exaggerated. The simple and fixed beams use the same deflection scale; the other examples show patterns under their stated loads.
Simply supported
Uniform load across the span
SupportsBoth ends can rotate.
NoticeThe beam sags between the bearings, with its largest downward movement near the middle.
Why it mattersUse this model when the bearings allow rotation.
Cantilever
Downward force at the free tip
SupportsOne end is fixed; the other is free.
NoticeThe tip moves down most. Hogging is strongest at the fixed end.
Why it mattersThe fixed connection must transfer bending moment.
Fixed–fixed
Uniform load across the span
SupportsBoth ends are held against rotation.
NoticeHogging develops near the ends and sagging in the middle. It deflects less than the same simply supported beam.
Why it mattersOnly use fixed ends when the real supports can resist rotation.
Overhanging
Span load plus a large downward tip force
SupportsThe beam projects beyond support B.
NoticeThe loaded tip moves down and the span curves upward in this case. Hogging peaks at B; A needs hold-down.
Why it mattersAn unanchored bearing at A cannot provide that hold-down.
Continuous
Uniform load on both equal spans
SupportsOne beam continues over the middle support.
NoticeEach span sags, with hogging over the middle support. The middle support carries the largest reaction.
Why it mattersTwo separate beams meeting at a support are not automatically continuous.
Use the support details to choose the model. For the same uniform load, span and stiffness, a simply supported beam deflects five times as much as a fixed–fixed beam. Choosing “fixed” without real restraint can hide that movement.
Show the full comparison table
| Beam and load | Determinacy | Reactions | Moment pattern | Deflected shape | Assumption to check |
|---|---|---|---|---|---|
| Simply supported Full-span uniform load | Determinate | Equal upward reactions | Zero at both ends; sagging in the span | Downward; largest at midspan | Both bearings allow rotation; one allows horizontal movement |
| Cantilever Downward tip force | Determinate | One upward force and a resisting support moment | Hogging; largest magnitude at the fixed end; zero at the free tip | Downward; largest at the free tip | The connection and supporting structure provide rotational restraint |
| Fixed–fixed Full-span uniform load | Indeterminate | Equal upward forces and moments at both ends | Hogging at both ends; sagging at midspan | Zero rotation at both ends; less deflection than the same simple span | Both ends have enough rotational stiffness to justify fixity |
| Overhanging Span load plus a large downward tip force | Determinate for the pin-and-roller model | The far bearing may need a downward hold-down force | Hogging over the support beside the overhang; zero at the free tip without an applied couple | The loaded free tip moves downward | A bearing alone cannot provide hold-down if the far end lifts |
| Continuous Two equal spans, uniform load on both | Indeterminate | Upward forces at all three supports; the middle reaction is largest | Hogging over the middle support; sagging within each span | Both spans bend downward; rotation stays compatible across the middle support | The beam continues through the middle support without a moment release |
Optional: explore the five prepared calculator models
Open any example to explore its response. These extra models are not required to finish Lesson 1.
Optional: apply this to a beam from your work
Use the same three prompts as the guided activity: which supports fit the connection, what evidence would justify fixity, and what still needs a separate check. No project example or separate submission is required.
Before you practise
Three ideas to keep in mind
1. Match the support to the connection
A beam resting on a column is not automatically fixed. Ask whether the connection and the structure behind it prevent rotation. For the supplied example, both bearings allow rotation, A prevents horizontal movement and B can slide. A pin at A and a roller at B match those conditions.
The simple and fixed–fixed models both give 24 kN upward at each end under this symmetric load. Matching reactions alone does not prove the support choice is correct. The end moments and deflections differ.
2. Check that the beam is restrained
A pin and a horizontal roller prevent rigid-body movement in the plane. Two horizontal rollers leave the beam free to slide horizontally. Counting restraints is not enough: their directions and positions also matter.
Determinate means the reactions can be found using equilibrium. Indeterminate means stiffness and compatible deformation are also needed. A model can have extra restraints and still be unstable if they do not prevent the relevant movement.
3. A middle roller is not an internal hinge
A continuous beam remains connected over its middle support. The roller provides a vertical force, while the beam itself transfers internal bending moment across that location. Splitting it into separate simple spans changes the structure. The rotations on either side must be compatible.
Complete the single guided activity below. The formulas, worked answers and guided choices are provided. Your answers become the workbook entry.
Optional: connections between pinned and fixed
Real joints may provide partial rotational restraint. A rotational spring with stiffness kθ can represent that behaviour. Compare kθ with EI/L: the dimensionless ratio kθL/EI indicates how joint stiffness compares with beam stiffness. Low values approach released rotation; high values approach restraint. There is no universal cutoff. This extension is not required for the activity.
Lesson 1 · Guided practice
Choose the right supports
Use the supplied 6 m beam with an 8 kN/m full-span load. Choose its supports and compare three results. Everything you need is on this page. You may use the worked answers at any time.
Try every step here without an account. Enrollment adds saved answers, a workbook and course completion records.
Continue the course
Work toward your hours and completion certificate.
$99 USD, paid once. Follow the 3-hour CPD / PDH learning plan, record your actual study time and receive your personalized certificate after completing the activities and passing the assessment.
See pricing and enrollment